|
Last week Elisa Giommi, owner of Mangetout Cafe, suggested that I try a different preparation for the samples of Four Mile River Farm meats I serve up at Fiddleheads every Saturday. "Slice the beef in thin strips and grill it immediately for each customer; like for fajitas..."
I bristled automatically at the word 'fajitas'. I'm indifferent to "Mexican cuisine" in general, thanks to the sloppy offerings of a certain Big-Chain-Purveyor-of-Fake-Mexican-Cuisine during my formative years. "...or Korean..." she continued, and that seed landed in very fertile soil. * A bit of googling (is that a verb?) brought me to a recipe for bulgogi on My Korean Kitchen . All of the ingredients I used were from Fiddleheads, including a ripe bosc pear. I made a few small adjustments to the recipe: I substituted freshly-grated organic ginger for the powdered ginger; rapadura sugar and honey stood in for the brown sugar. Most significantly, I used about 2 pounds of FMRF top round rather than the sirloin the recipe calls for. The leanest cut that FMRF sells at the co-op, and therefore one of the cheapest cuts, top round is, in my opinion, a very underrated cut. It has a very silky texture when you cut it into thin strips and can be more flavorful than some of the more expensive cuts. Using top round also allows you to economize without seeming to do so; you can serve this recipe to your guests and no apologies. (Besides, you really do want to save that sirloin for the grill, preferably over hardwood or coals. Trust me.) But would the recipe work on a practical sense in the busy "theater" of the co-op? For that's really what the FMRF booth at the co-op is, and indeed any kitchen - a theater. I've read a lot and even written about cooking being an act of sharing and an act of love, but it's also a drama being played out. In this case, though, the cook (me) and the customers/eaters on the other side of the table take on the roles of performer and spectator interchangeably. I flung the strips into the hot pan with a flourish, a good bit of fun, then listened to the gratifying and repeated exclamation and moans: "Oh my god! What is the recipe?" And then the freezer was emptied of top round - and sirloin tip, or any cut that would fit the bill. So yes, it worked very nicely indeed. Bulgogi (Marinated Korean Beef) (adapted from My Korean Kitchen) 2 pounds good-quality and VERY fresh top round beefsteak Marinade: 5 T soy sauce (I used gluten-free) 3-1/2 T rapadura (or other raw) sugar 1-2 tea honey 1-1/2 T rice vinegar (I used white) 2 T grated onion 4 T coarsely grated pear (1/2 average-sized bosc from FH = 4 T) 1-2 cloves garlic 1 T freshly grated gingeroot, or to taste black pepper to taste dash of cayenne powder handful of raw white sesame seeds 2 T - 1/4 cup sesame oil (to add at last moment) canola or other light oil (for pan) Rinse thawed beef, pat dry, then slice into thin slices across the grain, about 1/4" thick, give or take (no, don't pull out your ruler, just go by feel). Mix together all ingredients for marinade (don't include the oils); tasting and adjusting as you go to your liking. (More soy sauce? More ginger? etc) Add the beef strips, stir to coat thoroughly, and leave at room temperature for at least 1 hour (or up to 4 hours in the refrigerator). Heat your wok or non-stick skillet (if you're using an electric skillet and have a temperature adjustment dial on it, turn it to 325-350 degrees F.) Add a little bit of canola, just enough to coat pan surface; while heating add some sesame oil to the beef and marinade and stir again to coat. When the pan is just hot, fling the strips of beef in with a flourish and a smile. (Presentation is most important here; it's all in the wrist.) Sear (browned, not burned), for perhaps 30 seconds or so on the one side; flip and sear on the other for just a few seconds more, until none of the meat looks visibly "raw". Take out of the pan and serve immediately; it's at it's best when hot. You can wrap it in softened rice paper, or wrap in lettuce leaves for less fuss and bother, with matchsticks of sauteed daikon radish, and/or cucumber or other crisp raw vegetables. You can also serve over rice or noodles, if you like. The original recipe calls for a dipping sauce. You don't need it and you won't miss it. *I freely admit never having experience the genuine article when it comes to Mexican cuisine. On the other hand, repeated exposure to cans of fake "chinese" food from the big-box retailers, or bad meals at questionable "oriental" restaurants, has only increased my appreciation for lovingly-prepared shrimp pad thai, it's mound of soft rice noodles topped with crunchy peanuts; vegetables spring rolls in soft wrappers and served with a gingered dipping sauce; hearty beef pho with fresh basil; and I would mainline tom kha gai (Thai coconut soup) straight into my vein except for the pleasures my mouth would be missing out on. No, I don't understand it either; some things in life are simply not to be questioned.
0 Comments
A few years back (the '90's, perhaps?) I recall reading a newspaper or magazine article about the rise of "comfort food" amongst folks of every income level, and at fancy restaurants of the day. Suddenly everyone, it seemed, wanted the "simple comfort foods" of their childhoods, the food of the working class, from that magical, golden time and place called "yesterday" that I suspect exists only in fantasy and memory. The article specifically made mention of meatloaf as a popular offering; I laughed at that and said "They're welcome to it."
When my brothers and I were teenagers we were "latchkey kids", though we never thought of ourselves as such or used the term in conversation. The fact was, however, that we came home and made dinner for ourselves and tried to help raise our younger sister (who, no thanks to our sloppy efforts, turned out just fine: a loving wife and mother of two kids, with all of her street-smarts and no-nonsense sass fully intact.) I took turns being the primary cook with my brother Ed; the rotations were based something along the lines of "Nobody appreciates all the work I do! I'm sick of this, you do it!" As a matter of fact I did enjoy cooking and baking (sometimes), and I allowed myself a certain creativity with it (sometimes), within the bounds of our mom's modest budget. There were other items, however, that I slogged through joylessly but made them nonetheless because they were cheap and filling. Meatloaf, and it's demon spawn, salisbury "steak", were such items that struck me with dread and loathing. The meatloaf recipe probably came from our copy of the Betty Crocker Cookbook, which was covered in grease stains on the inside and, eventually, black electrical tape on the outside to hold it together, and was already missing several pages. (The only recipe from that book I wanted to copy down when I left home to go to college, the spiced sour-cream raisin pie with meringue topping my mom made so superbly was, of course, on one of those missing pages.) I recall the meatloaf being a large dark hunk that I referred to as "a bowling ball". It was slathered with bottled barbeque sauce because that was the only part of it I liked, then shoved in the oven until it was overdone on the inside yet floating in a pool of hamburger grease on the bottom, plus crusty, sticky and red-black on the outside from the semi-burnt sauce. You might not be surprised to learn that I never made it again after I left home and went off to college. In fact, I made a silent vow to myself: "I am NEVER making meatloaf again - ever!" Which is not quite as dramatic as, say, Scarlett O'Hara's vow - but I doubt that even she would be so hungry as to stoop to making that ground beef bowling ball. I spent many a tight and hungry year through college and beyond and consumed bowls of oatmeal and rice in preference to ever breaking my vow. But last year, older and, if not wiser, then a bit more open-minded with a "what the heck" attitude towards life and the kitchen, I actually succumbed to the unsuspected charms of my lifelong nemesis, brussels sprouts. (See previous recipe posts.) So I suppose anything is possible. "Anything", at the moment, happens to be the recipe reader Martine Flory sent me the other day: her version of meatloaf using some of the usual ingredients - an egg, carrot, ketchup, onion etc - but held together with ground turkey, which Ms. Crocker never dreamed of back in the day. (Or if she did, she never mentioned it.) Turkey is of course a leaner option than ground beef but is rather dry; here, a modest amount of ground pork is added as a supporting player for moistness. I personally might add a bit of stone-ground mustard to the ketchup glaze; ketchup and mustard can go all sorts of places together and not just on a hot dog. Another idea for this would be to try a more "Asian"-inspired glaze, perhaps a teriyaki sauce with a bit of ginger or lemongrass. (There are several excellent ready-made choices at the co-op.) If you happen to shop at Fiddleheads and can't find plain ground pork, substitute a pre-seasoned ground pork sausage, and adjust the rest of your flavorings accordingly as needed. (Four Mile River Farm's pork breakfast or sweet italian sausages would both go quite nicely in this, I think.) Martine Flory's Turkey and Pork Meatloaf (adapted from JENNIE-O recipe) 2 T olive or canola oil 1 cup chopped onions 3 cloves garlic, minced 1 lb. lean ground turkey 1/4 lb ground pork 1/2 cup fresh bread crumbs 1/2 cup shredded carrots 1 large egg 3/4 cup ketchup, divided 2 tea. Worcestershire sauce 3/4 tea. salt 1/2 tea. ground pepper Pre-heat oven 350 degrees F. Lightly oil a standard-sized loaf pan. Heat oil over med-high heat in small frying pan. Add the onion and garlic and cook 5 minutes, stirring occasionally. Transfer to a large bowl and let cool for another 5 minutes. Add turkey, pork, bread crumbs, carrots, egg, 1/4 cup of the ketchup, Worcestershire sauce, salt and pepper to the bowl with the turkey and mix well, until thoroughly combined. Pack into the loaf pan and spread remaining 1/2 cup ketchup on top. Bake 50 to 55 minutes or until the meat is no longer pink in center, with an internal temperature of 165 degrees on a meat thermometer. Remove from oven and let stand 5 minutes before slicing. Serves about 5. 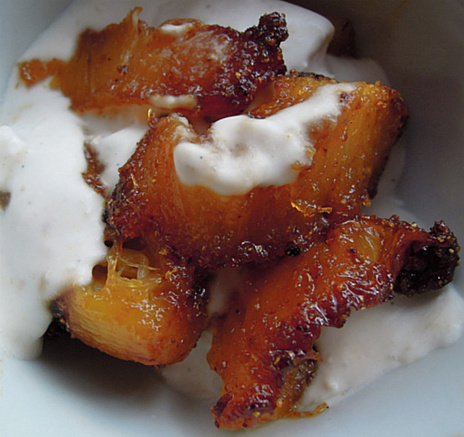 If you never roasted pineapple in the oven, you owe it to yourself to give it a try, especially now that we have organic pineapple coming into the co-op once again. It's super-simple (once you get past prepping the fruit) and ridiculously addictive. This is really more of a suggestion than a recipe, as there is no hard science here; basically you're popping fresh pineapple spears in the oven until they are tender, then glazing with a mixture of honey and ground coriander until it starts to brown and carmelize. The result is something akin to candy (if candy were warm and juicy) but much, much better.
Preheat your oven to 375-400 degrees F, depending on how hot it runs. Peel and core 1 fresh (preferably organic, of course) pineapple; this is not hard, but it's time-consuming and requires a bit of attention if you want to keep all your fingertips intact. (I've become rather fond of mine, thank you.) The method I use is essentially Betty Crocker's, as that was the cookbook I grew up with: "Twist top from pineapple. Cut pineapple into fourths. Holding pineapple securely, cut fruit from rind. Cut off pineapple core and remove "eye". A different method has you remove the outer peel before you quarter and core it; Sandy Smith shows how it's done with simple instructions and clear photos at Eat Real. Once you've got the basic prep done, cut the pineapple quarters in half, then half again to get thin strips. (If you'd rather have larger spears, only halve the quarters once; or if you prefer, cut the spears into large chunks.) Lay them down on a lightly oiled baking tray, and put in the middle of the oven. In the meantime stir together enough honey and ground coriander to taste; you want enough to glaze the pineapple spears but not drown them. Check the pineapple after 5-8 minutes; if starting to become tender, flip spears over to the other side, cook until thoroughly tender but not falling apart. Pull tray from oven and drizzle or spoon the honey glaze over both sides of the pineapple to coat thoroughly, return to oven 3-5 minutes until honey starts to carmelize. Turn spears over if necessary and repeat. And that's it. If you can wait until it cools a bit the honey gets stickier in contrast with the fruit inside; but I doubt it will make it that long, unless you are far more disciplined than I am. You'll be eating it right out of the oven, it's that good. It's delicious as-is, of course, but I couldn't resist gilding the lily and topping it with a dessert sauce I had made from thick coconut milk kefer combined with toasted coconut flakes and vanilla bean, grated fresh ginger, mandarin orange juice and a bit of orange zest. The tropical notes of the sauce seemed an appropriate pairing for the fruit. Another lovely idea would be scoops of vanilla bean or coconut ice cream, sprinkled again with toasted coconut. 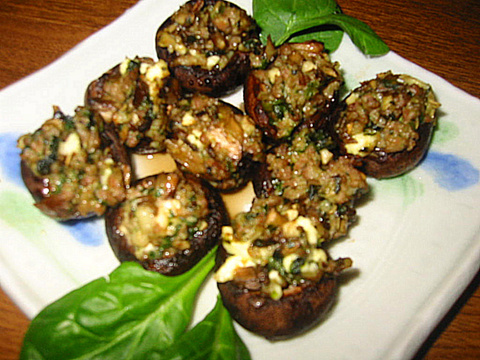 (Photograph by Laura Phillips and used with permission.)
Linda Phillips was inspired by my portabello stack recipe from 12/26 to come up with her own version, this one incorporating Four Mile River Farm's pork breakfast sausage, pre-seasoned with red pepper and sage. with wilted spinach leaves and feta cheese. Use portabellos if you want to make this a main dish, or crimini mushrooms ("baby bellas", the "junior" versions of portabello) to serve this as an appetizer. If you are a Fiddleheads customer and the FMRF pork breakfast sausage unavailable at the co-op, try their pork sweet italian sausage, which has subtle flavor notes of black pepper and fennel; or use their plain ground pork and add your own seasonings. Of course if you are far beyond the Fiddleheads universe, then use whatever pork sausage is available to you, preferably locally-sourced, hormone and steroid-free, preservative-free, and so forth. Whatever you use, give it a whiff before you cook it; fresh (or newly-thawed) meat should have little if any odor, or should smell mild and sweet. If it smells "like meat", it is starting to turn rancid. (The same applies to fish; ask to smell it at the fish counter and if it smells "fishy", don't buy it.) Laura Phillip's Stuffed Mushroom Caps with Pork Breakfast Sausage, Spinach and Feta Cheese small to medium-size portabello mushroom caps, OR large crimini (baby bellas), cleaned and de-stemmed pork breakfast sausage, crumbled (Laura used Four Mile River Farm's) fresh spinach leaves, finely chopped feta cheese Heat oven to 350 degrees F. Arrange prepared mushroom caps, gills-side up, on lightly oiled nonstick baking tray or dish. Cook sausage in skillet over medium heat until browned; remove from pan with slotted spoon onto plate or bowl lined with paper towels to drain. Reduce heat to low and stir spinach into the sausage drippings, stirring occasionally; cook 1-2 minutes or until wilted. Turn off heat, and add feta to pan. Mix spinach and feta with the pork sausage, then spoon evenly into prepared mushroom caps. Bake 12-18 minutes, or until mushrooms are tender but not mushy in the centers.  Last Saturday at Fiddleheads, the day before Christmas, was a festive day - genuinely festive, not the fake-festive we've become depressingly accustomed to this time of year. After the expected opening rush, business was steady but not overwhelming. Lacy and Monica both brought homemade cookies for staff to enjoy, and I put out jars of homemade jelly; the raspberry-ginger-lime variation was snapped up quickly. (I have no idea why it took me so long to realize that sharing the jelly with friends at the co-op is the perfect answer to the dilemma: "What am I supposed to do with all of this stuff? I hardly even eat bread anymore!") At closing time there was eggnog and more treats, plus several volunteers on hand to make the usual tasks more enjoyable - and get everyone the heck home in a reasonable amount of time. (FYI: I had to leave about then and didn't imbibe, so I have no idea if the eggnog was "spiked" or not.)
Ellen Anthony, the co-op's Bulk Dept manager (a.k.a. "Dr Bulk", a.k.a. "Goddess of Bulk") presented me with a substantial bundle that filled my hand, wrapped in wax paper. "It looks like a muffin but it's fruitcake," she said, as if that was all the explanation needed. Then she smiled her cheshire-cat smile and turned away without another word, like the Cheshire Cat himself. I looked down at the gift in my hand and thought "But, it does look like a muffin. How can it be fruitcake? Maybe she's teasing me." In her usual way, and not for the first time, the Goddess had turned the most mundane thing into a source of fabulous mystery. I waited until the next day to fully investigate that mystery: The muffin-fruitcake was very dense, a bit dry, pale yellow in color, not soaked in rum or sugar syrup. There were no pecans, no glace cherries, no citron; nothing in a frightening or unnatural shade of red or green. There were sunflower seeds, sunflower seeds, and chopped, dried fruits such as papaya and pineapple and cranberries - perhaps blueberries, as well? Treasures all found in the Bulk department, of course. And just enough batter to hold all those goodies together. Ellen wrote: "I got the recipe from Laurie's friend Roland in 1999, and adapted to suit." Ellen Anthony's Fruitcake with Dried Fruit, Almonds and Pumpkin Seeds Preheat oven to 275 degrees. Cream these in this order as usual: 1 lb room-temp. butter 2 c. sugar 6 egg yolks 1 T. warm water 1/4 c. Grand Marnier or cream or milk Sift together: 3 c. all-purpose flour 2 c. sugar 1 t. salt 1 t. baking soda Mix dry stuff into wet, then fold in: 6 egg whites, beaten stiff Mix into the batter with strong, clean hands: 1 lb. mixed cut up dried fruits (papaya, pineapple, blueberries, cranberries, currants, etc.) 1/2 lb. pumpkin seeds (See Note) 1/2 lb. slivered almonds Spoon into a buttered baking pan: tube pan, jumbo muffin tins, whatever. Smooth the top with wet hands or a spoon.The bigger the pan, the longer it will take to bake. Muffin size might be 1/2 hour or so; big tube pan an hour and a half. Cool completely and then store in an airtight container. It's pretty dry, so within a few days recipe. Or soak with liquor and store in a tin. Bon Apetit! Note (1/2/2012): Ellen wrote me back after the original post that the recipe should read "pumpkin seeds" not sunflower; the correction has been made. She also added, however that if she were to put in "sunnies" she would probably toast them first. 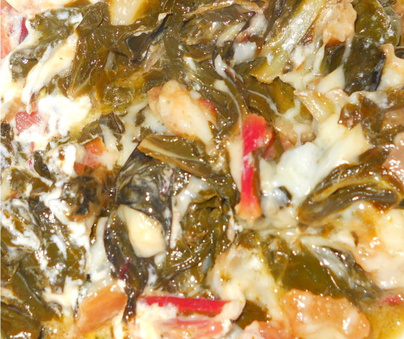 (Photo courtesy of Loretta McElwee and used by permission.)
When my friend and fellow co-op member Loretta McElwee passed along her friend Nat Hale's recipe to me a couple of weeks ago, I admit I wasn't particularly open-minded about it: "Cheese, butter and rum with chard? Delicate, perfect-just-as-it-is-the-way-the-Universe-intended-it chard? Sacrilege, that's what it is." Then she then made it herself and sent me the photos, such as the one above, and I decided that perhaps I could be seduced, after all. (Apparently I am easy, if not necessarily cheap. Or am I cheap but not easy? Just ask my friend Miss B.) Loretta wrote in her email to me: "I made this twice - once with goat cheese, which I didn't care for, and once with Havarti which I loved!" Nat's recipe simply calls for "soft cheese" and he suggests a few options; so follow Loretta's lead in choosing one that you prefer. When I asked her about the butter, she thought that it could be omitted and olive oil used by itself without affecting the recipe. (I had no problem with the cheese and rum, but freaked over the butter? No, I don't understand it, either.) Nat Hale's Swiss Chard with Soft Cheese, Balsamic and Rum 1 bunch swiss chard, any variety 2 tbsp. olive oil 3 cloves of garlic diced 1 cup white wine 1 tbsp. balsamic vinegar 1 tbsp. spiced rum 2 tbsp. of soft cheese, such as goat cheese, or havarti Wash the chard and separate the leaves from the stems. Tear the leaves into bit sized pieces and cut up the stems. In a deep skillet, heat the butter and olive oil. When butter melts, add garlic. Add wine and chard stems. Cover and cook on medium until stems are soft. Add chard leaves. Cover and cook until the leaves have reduced in size and most of the liquid is evaporated. Stir occasionally; reduce the heat if you plan to leave unattended. Add balsamic vinegar, spiced rum, and cheese. Cover until cheese melts. Serve.  A) What is the correct pronunciation of the word "Quinoa"?
1) "KEEN-wah" 2) "kwi-NO-uh" 3) "All I know is that when I tried to say it at the Christmas party, everyone laughed at me. Since then I prefer to keep to myself." 4) "I have no idea what you're talking about. Is that some Native American rock band?" B) Well, what exactly IS quinoa? 1) "A seed of a plant that is a member of the goosefoot family, native to South America. Humans have cultivated it as a food source for over 3000 years. Did you know it's a great source of vegetable protein and that the Aztecs....." 2) "Some sort of fluffy stuff my health-crazy spouse/significant other keeps foisting on me. *sigh* The things I do for love." 3) "Enya's latest album?" 4) "If it's not a Native American rock band then I still have no idea what the heck you're talking about." If you're looking for the answers, go to the bottom of this article - or try Hari Krishna. (Yes, that was a shameless theft.) Most of the references to quinoa I've seen refer to it as a grain. But according to this article(and if it's on Wikipedia you know it's got to be true, right?), quinoa is "a species of goosefoot...grown for it's edible grain-like seeds. It is a pseudocereal rather than a true cereal or grain, as it is not a member of the grass family." *end horticulture lesson* I'd never heard of it myself until just a few years ago; now it seems nearly everyone has heard of it, and for good reason. It's a source of vegetable protein (just how much, exactly, is under debate), gluten-free and easily digestible, making it a boon to the veganarian menu, and to anyone suffering celiac's disease (or related allergies). It's also quick and easy to make, ready in about 10-15 minutes on the stovetop compared to 30-45 minutes needed for brown rice or wheatberries. Even though it's not a "true grain" it can take the place of rice, etc at any meal. And it's extremely versatile: it's soft texture and bland flavor let the stronger ingredients shine in any dish. (I've had it for breakfast in place of oatmeal, which is carb-heavy and makes me a bit sleepy by lunchtime.) If you're new to it and trying to find out how to make the most of it, the recipes available online are literally, countless; the problem is not finding a recipe, but choosing one. A few ideas to get you started: Lemon Quinoa with Asparagus and Feta from the Cookthink website caught my eye almost immediately because of it's "sunny" quality and balance of flavors. Substitute 1/2 tea. dried in place of the 1 tea. fresh herb called for. Substituting fresh cilantro, flatleaf parsley or basil would give it a different character, I should think, but might be worth a try anyway. Cooking Quinoa, as you might imagine from the name, has so many recipes I didn't know where to begin - until this recipe for Quinoa Chocolate Bars stopped me dead in my tracks. Yes, chocolate - real chocolate - plus coconut butter, almonds, a bit of salt. Some of the dried cherries or blueberries from our Bulk section would be amazing in these. A very informative website, hundreds of recipes, but lots of images and can be slow to load. (It seems to work better with Safari than Foxfire.) What Would Cathy Eat? is one of my favorite go-to websites for recipes that are veganarian AND heart-healthy, which are not always the same things, as well as plain delicious. A few that are perfect for what it's in season and available at the co-op right now: Curried Quinoa with Cauliflower and Stuffed Kabocha Squash with Quinoa and Chickpeas. I've seen a lot of recipes online that use quinoa as a stuffing for all varieties of hard squash, so you can really give your imagination free play here. Quinoa can also be sprouted as a microgreen; here's some instructions from yet another quinoa-dedicated website called (what else?) Quinoa Health Tips. (At this point, quinoa just might be more famous than the Beatles.) Hopefully that will get you off and running if you're new to quinoa; if you were ahead of the curve and it's already a part of your menu, what are your favorite ways to use it? Share in the comments section here or drop me an email. Answers To "The Quinoa Quiz": A) #1. If you answered #2-4, do come to the Bulk Section of Fiddleheads where we will answer all your questions, and then some. And hopefully save you from embarrassment at your next party - just don't attempt to say "tumeric". B) Also #1. If you said #3 or 4, then see answer to A (above) and get thyself down to the co-op. If you said #2 - we admire your dedication to your partner and your willingness to try new things. (That said, you probably deserve a little payback. Five words: Last Thanksgiving. Your Uncle Jack. 'nuff said.) 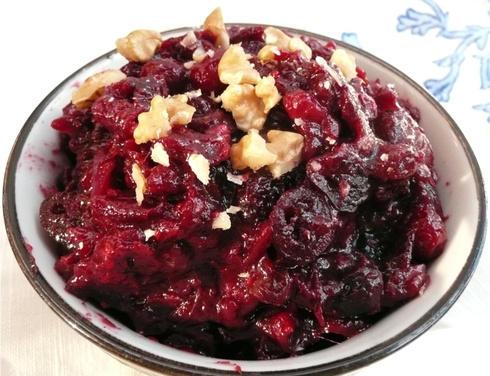 Joan Weigle, who staffs the Fiddleheads Membership Info Desk every Saturday, loves Lior Lev Secarz's Spicy Cranberry Chutney with Apricots and Pecans . This recipe blends fresh cranberries, heated in cider and pomegranate juice, dried apricots and toasted pecans, then seasoned with ginger, cinnamon, clove, fennel, orange zest, etc. to subtle and complex effects that Joan appreciates. She said that it won the day for her in a competition with her daughter to determine who made the better chutney.
Cost of fresh cranberries at Fiddleheads: $3.00/lb Hearing your child admit for once that Mom/Dad is right: PRICELESS ************************ In the last two years I have inexplicably gone from "I can't stand spicy food" to "You call that spicy?" So if you're going to label your recipe "spicy", you'd better bring it. For a time I fancied it was a result of growing sophistication on my part, until a friend pointed out to me, "Don't you know that you lose taste buds as you age?" (Yes, but I forgotten - because I didn't yet conceptualize myself as "aging". But now I do. Thanks. And I'd been so happy in my little world of fragile illusions "Look, a unicorn...!") When I made the first batch of this for myself, I had to make some small adjustments due to availability and budget. I used watered-down black current juice from the co-op, which I already had at home, in place of the apple cider and pomegranate juice called for in the original. Black current juice is fairly strongly-flavored; nonetheless he result was, for my palate, surprisingly bland. I couldn't even taste the pecans, except to as a bit of crunchy texture. Tasty, but hardly worth the trouble and expense over my regular cranberry sauce recipe. (Now if someone would like to make a batch and show me how to "do it right"? Meet me at Fiddleheads and I will be glad, unlike Joan's daughter, to be proven wrong.) So for my version I've I doubled the spices, added a splash of unfiltered apple cider vinegar, and a dash of cayenne in addition to the original's versions spices. Pecans are replaced by the more strongly-flavored and economical walnuts and raisins are thrown in the mix. Finally a touch of maple syrup balances the acidic flavors. You'll want to let it "rest" for 48 hours in the fridge to allow the flavors to mellow and really come together: tangy but not sharp, slightly sweet without being sugary. It's only when each bite slides off your tongue at the last do the spices "announce" themselves. Spicier Cranberry Chutney (adapted from Lev Lior Sacarz's original) 1/2 medium or 1 small red onion, chopped fine olive oil for skillet 1 tea. ground cinnamon 1 whole anise star, or 1/2 tea. either ground fennel or anise 1/2 - 1 tea. ground cardamon 1/4 tea. ground allspice 1/4 - 1/3 freshly grated ginger 1/4 tea. ground cayenne 1/2 cup black current juice 1/2 cup water juice and pulp of two large oranges 12 ounces fresh or frozen (thawed) cranberries black pepper to taste 1/4 - 1/3 cup raisins 1/3 cup dried cranberries 1/2 dried apricots, chopped into small dice (to prevent knife from sticking, coat with a very small amount of oil or other oil) 1/3 cup walnuts, toasted/dry-roasted, then coarsely chopped or broken 2 tea. finely grated fresh orange zest, or the same amount of dried orange peel in small pieces, soaked in tepid water until softened 2 T apple cider vinegar 7-10 tea. maple syrup or amber (neutral) agave syrup, or to taste wheatberries, cooked (optional, see note below) In a heated skilled with slightly amount of olive oil, saute the chopped onion on low heat until tender and translucent, stirring frequently to prevent sticking; do not allow to brown. Combine spices, except pepper, with the current juice and water into a large saucepan; add the orange juice and pulp to the pan. If using dried orange zest rather than fresh, and it and the soaking water to the pan now. Bring just to boil, then add the fresh cranberries; allow to return to the boil, stirring frequently to prevent scorching, until cranberries begin to pop, about 5-7 minutes. Add a few rounds of cracked black pepper to taste. Remove from heat and allow to cool slightly. If you used whole anise stars, fish them out now before going on to the next step (unless pawing through a bowl of chunky burgundy chutney looking for chunks of barely-darker anise stars is your idea of a good time.) In a bowl combine the dried fruits and the walnuts; if using fresh zest rather than dried, add it now. Add the cooked cranberry mixture to the bowl, and the apple cider vinegar. Add the sauteed chopped onion. Combine everything thoroughly, making sure fruits, nuts and onion are well-coated. Add the sweetener to taste, in increments, until satisfied, and adjust all seasonings to your liking. The taste at this point will probably be somewhat sharp. Put into the refrigerator in a covered container, and allow to "rest" for at least 48 hours if possible; by then the flavors will have sufficiently "mellowed" and come together nicely. Note: Cooked wheatberries stirred in any time after combining all other ingredients, even days later, add a chewy texture element. They also lend a heft that makes the chutney more substantive and filling; makes a nice breakfast or anytime treat. It also solves the vexing question, "I got this because I'm trying to add whole grains to my diet but now what the heck do I DO with them?"  Back on December 14th I wrote up a plain-and-simple recipe for oven-roasted portabello caps with olive oil, salt and pepper. Last night for Christmas dinner I made something along the same theme, but a bit fancier: this time I mixed up a sauce of olive oil, vinegar, tumeric and spices, poured over the caps; then I topped them with chopped veggies, including shiitake mushroom caps and white button mushrooms (when it comes to the 'shroom, for me less is never more.) I added whatever I had at hand, such as tomato and spinach, then topped the caps with two kinds of cheeses. After the 'shrooms were tender and I had removed the pan from the oven, I reserved some of the pan juices as a salad dressing over deeply-colored red leaf lettuce.
This looks like a "recipe" but is really more of a "suggestion" I think, because I've done the same thing previously but with different sauces and spices, different veggies, etc. (Bell pepper of any color made an especially nice addition on another occasion; and I can imagine adding a little scoop of quinoa atop the caps, or served alongside.) To make this completely vegan, simply use a vegan cheese such as almond cheese, or omit altogether. In a prior version I also chopped some canadian bacon into small dice and added it atop the caps; tasty, but unnecessary. The only essential here is the portabello caps themselves, the meatiest of 'shrooms and the foundation of the "stack". Beyond that, make any substitutions that your fridge and your fancy will allow. Portabello Mushroom Stacks with Tumeric Sauce serves 2 2 T olive oil, plus extra to coat baking dish 1-1/2 - 2 T "red" vinegar - red wine, apple cider; or balsamic 1/4 - 1/2 tea. ground tumeric black pepper to taste 1/8 tea. or about a pinch of ground cayenne 1 medium-size garlic clove, crushed and finely minced 1-2 small scallions (green onions), or whatever green shoots happen to be sprouting out of your onion basket, chopped fine 2 portabello mushroom caps, stems removed, any surface dirt wiped off veggies cut into very fine dice: carrot, shiitake mushroom caps (stems removed) and small or medium button mushrooms 1 small tomato, seeds and core removed, diced baby spinach leaves, about 6 (or substitute 2 mature leaves) parmesan or other hard cheese, grated 2 slices swiss cheese Preheat oven to 425 degrees F; coat baking dish (ceramic, glass or metal) with a thin film of olive oil. Combine the first five ingredients in a measuring cup, adjusting to your liking with each addition. Add the white and palest green parts of the scallions, reserving the darker greens for later. Emulsify well. Pierce the portabello caps with a fork randomly, especially in the thick center part-way or all the way through; lay on baking dish gills-side up. Pour 1/3 - 1/2 of the sauce over the caps, then layer the various chopped veggies, including the reserved darker parts of the scallions, over the caps. (Of course some will spill off the sides. No worries.) Layer the spinach leaves atop the veggies, pour the remaining sauce over all of it. Grate the parmesan over the stacks as much or as little as you wish; layer 1 slice of swiss cheese over each, grate on a bit more parmesan if you like, and finish of with a few more rounds or pinches of black pepper. Place the baking tray in the middle of the oven and bake until the very center of the mushroom are fork-tender all the way through; 9-12 minutes should do. Remove from oven and let sit a couple of minutes if you like to let the juices settle. Pour some of the juices over the stacks when serving, reserving the rest for salad dressing (below). Salad dressing (optional): Let the remaining pan juices cool and crunchy bits cool a little, then emulsify with some tangy plain yogurt or keifer, a splash more vinegar or lemon juice, and seasonings (salt, pepper, etc) to taste.  You've been feeling your life is a little empty lately, as you wander about your apartment or home. (There's no shame in admitting it; we've all been there.) You've thought to yourself that you'd like a companion to always be there for you, but in non-human form. Sure, you could find yourself a lover or partner; perhaps you already have one. But you know that human beings are such a lot of bother. So you've narrowed it down to two choices: keifer grains (pictured above), or a puppy (pictured below). Both require constant care and attention, both need food and fluids daily, both will grow and flourish under the proper conditions, and both have reputed health properties. To help you make an informed decision, we offer you some strictly nonscientific comparisons. Round One: The Basics KEIFER GRAINS: When put into milk, water, juice, coconut milk, etc, it will create a drinkable sour (milk grains) or acidic (water grains) product that repopulates your intestines with lots of healthy microflora, according to it's passionate adherents. PUPPY: Will lick your face. Even if you're a jerk. WINNER: Possibly a draw, depending on how flora-philic or germ-phobic you are. Round Two: Noise KEIFER GRAINS: None at all, until you're slurping the resultant beverage down; or the cussing that follows when your fridge is filling up, and you realize you can't drink it fast enough to keep up. PUPPY: Count the nights your neighbor's dog has kept you up. You can't, can you? Exactly. WINNER: Advantage keifer grains - unless you are entirely or functionally deaf. Then it's even either way. Round Three: Cost KEIFER GRAINS: Quite inexpensive for the grains themselves- until you realize you need to feed it EVERY 24 hours with 8oz milk per teaspoon grains. EVERY 24 hours. Which still ends up being cheaper than buying the stuff - we think. PUPPY: You might save some money getting it from a pound, shelter, or rescuing it off the street - but you still have the shots, the exams, the collar, the food, the carrier, the bed, etc to deal with. And look out if Fluffy ever needs surgery, because your major medical ain't gonna cover that. WINNER: Keifer grains. Round Four: Letting Go, Or, After the Love is Gone KEIFER GRAINS: Easy-peasy. Put grains in water and stick them in the fridge to remain dormant, or dry out the grains and reconstitute when you're ready to resume keifering. Worst comes to worst, chuck them into the compost bin and buy some more. PUPPY: Extremely Difficult. Never mind losing a friend - if you have kids and you ever have to sell/give away dog for any reason, they will NEVER forgive you. Ever. Not until you hand them the keys to the brand new car you just bought them - maybe. Round Five: The Cute Factor KEIFER GRAINS: Resembles cottage cheese, not really cute per se until you look at it a while and realize, hey, it is kind of adorable in it's own way. PUPPY: Are you kidding? We need to explain this one? You must be a cat person. WINNER: No contest - and if you're spending that much time staring at your keifer grains, you clearly are in need of a little human companionship. We're worried for you. Join us next time for another in our helpful comparisons: "So You're Having a Midlife Crisis? $3000 Food Processor, vs Convertible." (Photo below courtesy of J. Holder - and yes, we know it's more of a dog than a puppy per se. We told you this was "unscientific", did we not? )  |

/recipe-archive.htmlPrintable pdf files of the recipes on this blog can be found on our Recipe Archive Page.

Archives
August 2014
Categories
All

Text and photos copyright 2011-2013 Janice Janostak unless otherwise noted. All rights reserved.
|
 RSS Feed
