(A version of this post previously appeared on the Fiddleheads Facebook page. So if you've read this already - feel free to move on and peruse other pages on this site.)
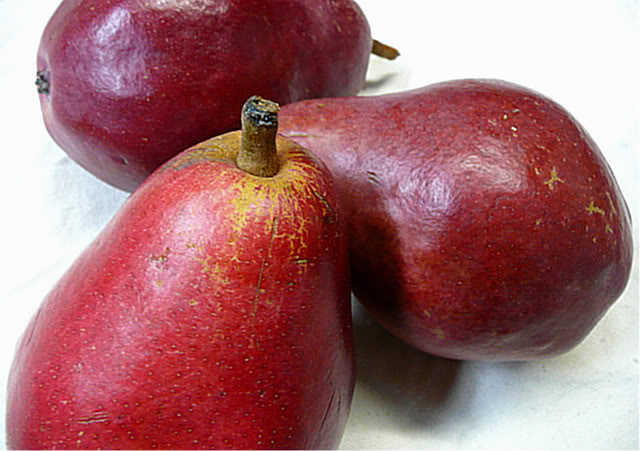
Last Friday I came into the co-op and saw, in the produce section, the signs that the seasons are shifting (far more reliable than our weather patterns at the moment): brussel sprouts, hard red kuri squash, etc. It was the RED STARKRIMSON PEARS that stopped me in my tracks; my favorite variety, and the first batch of the season at the co-op. The brain (mine, at any rate) must have an adaptive mechanism that allows me to forget about them, for months, so that when they reappear I am delighted and surprised all over again. I bought 5 or so, selecting carefully (money is tight, after all), looking for relatively unblemished ones; ghosting my fingertips over their skins and choosing the ones that yielded ever-so-slightly. They ripened further for a couple of days on my kitchen table, while I wondered and worried: would they disappoint this time? They never have before, but one never knows. Of course my concerns were foolish and unfounded; of course that first one was crisp (but not too) and sweet (but not overly-so). Of course the texture was finer and smoother than that of a traditional pear, or the ones I grew up with at any rate; somewhat closer to an apple. Of course, it was what I remembered and what I knew it could be. And of course I'm being silly about it, indulging in hyperbole, but when I feel as though living is somewhat like wading through a mound of mud and rubble, then the few small gems that fall into my hands are all the more dear. And so I magnify the importance of a pear, of all things, far beyond what someone (saner and more sensible than myself) would do. I ate the last one this morning - saving it carefully, for a day or two, until I knew I'd be coming back to the co-op - and it had been patient, had waited for me, ripened even further in the warmth of my kitchen, and so the flesh yielded easily, even sweeter than before, juice dribbling down my wrist, the texture closer to that of "pear" than apple now, but still very fine, closer to the softest beach sand than the graininess of other pear varieties at their ripest. The things I love most never stay for long; and I know from past experience that the red starkrimson pears will be here for a matter of weeks, perhaps (will I go to the co-op today and find they have already gone?) and so I must take care to to savor and enjoy them, for however long they are here.
0 Comments
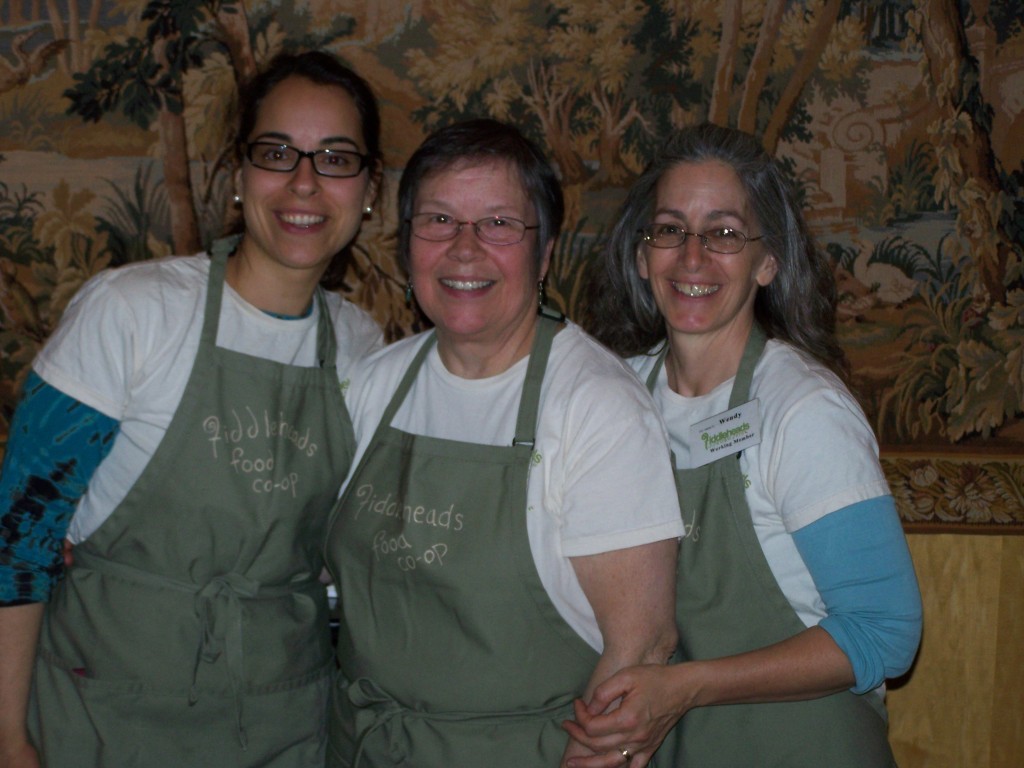 The lovely ladies of our Produce Team: Amelia Lord, Sue Guida & Wendy Jakobski at the Mystic Marriott, 04/16/12. (Photo courtesy of Wendy Jakobski.) On Monday Chef Paul Krawic invited Fiddleheads to do a tasting at the Marriott in New London to sample the Produce Dept's wares. Richard Virgin, Wendy Jakobski, Sue Guida and Amelia Lord were the "prep chefs" for the evening. Dishes sampled included a vegetarian stiry fry done by Richard, Sue's wheatberry salad, and sweet potato-lentil stew from Alicia's Silverstone's book The Kind Diet, brought to us by Alison La Bella. Sue told us her recipe for wheatberry & fruit salad came from Cooking Light Magazine, April 2010**; she has made it with and without the goat cheese listed, and each versions has it's devoted partisans here at the co-op. In other words, it's delicious either way, and the folks who got to taste it Wednesday night at the hotel certainly agreed. 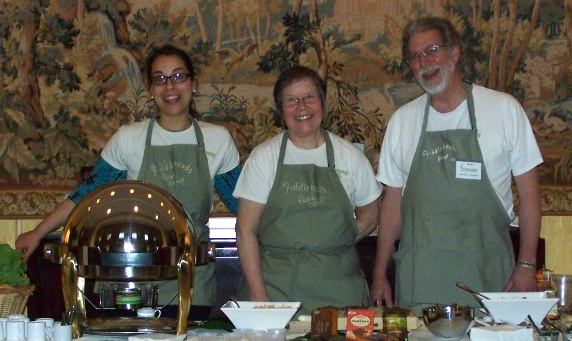 Amelia, Sue and Richard Virgin "represent" Fiddleheads at the Marriott, with humor and style to spare. (Photo courtesy of Wendy Jakobski.)
We had a lot of requests for the sweet potato and lentil stew recipe from folks who sampled it that night, and we promised to share it here: Alicia Silverstone's Sweet Potato & Lentil Stew From The Kind Diet (Rodale Books, 2009) 1/4 cup safflower oil 1 medium onion, diced 2 small tomatoes, diced, or 2 Tbsp tomato paste 1 tsp. fresh ginger, minced 1 1/2 tsps. turmeric 1 tsp. cumin 1 tsp. ground coriander 1/2 tsp. ground cinnamon 1/8 tsp. cayenne fine sea salt 2-3 medium sweet potatoes,peeled and cut into 3/4 inch cubes 7 cups vegetable broth 1 cup lentils, brown or multi-colored Heat the oil over medium in a large, deep pot. Add the onion and cook, stirring frequently, for 2 minutes or until the onion starts to soften. Stir in the tomatoes or paste and ginger and cook for 3 minutes. Stir in the turmeric, cumin, coriander, cinnamon, cayenne, and a small pinch of salt. Cook and stir for 2 minutes, then taste for seasonings; try to use only enough salt to heighten the flavors. Add the sweet potatoes, broth, and lentils. Stir well, and bring to a boil over high heat. When the mixture comes to a boil, reduce the heat, cover, and simmer for 30 - 40 minutes or until the lentils and sweet potatoes are soft. Serve on its own, or over rice or couscous. Serves 4-6. **Earlier today I listed Women's Day Magazine as the source of the wheatberry salad recipe; Sue corrected me and that has been fixed. -J- This week we finally brought plantain into the co-op, and the most I could offer in the way of what to do with them was "fried plantain". A friend from El Salvador had introduced them to me that way years ago, pan-fried until golden brown on each side and light sprinkled with powdered sugar, if I remember correctly. (That was also the night I had my first taste of properly-made guacamole - no sour cream, thank you very much.) Fried plantain is a comfort-food dessert or snack par excellence, lightly crisp on the outside, soft inside, warm and naturally sweet (I make it without the sugar at home). But I had never bothered to go beyond that and find out what else could be done with it beyond one failed attempt at eating it raw, not realizing that what I'd call "ripe" in a standard banana is still "underripe" in a plantain.
Fortunately my friend and co-op'er Gina Lissette White came to the rescue with some suggestions on the FH Facebook page this week that are too good not to share here as well, with her kind permission (text below courtesy on Gina; any errors however are to be blamed on my editing). Ripe plantains are delicious raw - "ripe" as in very yellow, so ripe that the outside is nice and spotted. What is "perfect" in a standard banana is underripe in a plantain because of their increased starch content. (The same is true of red bananas.) Fried plantain: Be careful when frying the very ripe ones because they start caramelizing and can fall apart if they're cut too thin. For a less sweet version, peel and slice green (underripe) plantain to about an inch and a half thickness, fry once on the outside, drain on paper towels, then "smash down" with the flat side of the knife or paddle, or glass bottom. Mix a little cilantro, sour cream, lime juice, and season to taste as a dip for those green plantains. You can also shred the green ones using a grater, season with a little salt and garlic and fry in clumps; in spanish they're called arañitas or "little spiders". Grill them with a chili pepper and honey baste. Or you can make mofongo out of it. (Janice's note: There are countless versions found online, no two exactly alike.) I don't have an exact recipe, but I have a list of ingredients that I use: mix some green plantain with yellow for a sweet/savory texture; add bacon or pancetta, throw in sauteed garlic, salt, pepper. I like to keep it simple and let the ingredients speak for themselves. -Gina White Variation: The contributor of the Chowhound version of mofongo (see link above) says that "if you don't use bacon stop at step 2" - that is, fry the ingredients together but don't smash them together in a mortar and pestle, "you have tostones". -Janice 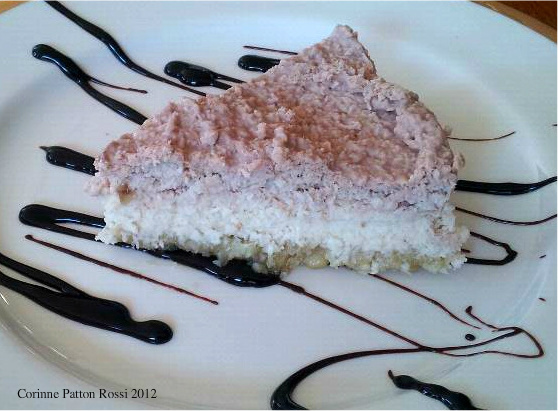 Corinne Patton Rossi (Fiddleheads member, owner of Better Bodyworks in Pawcatuck, and provocateur extraordinaire) adapted this dessert from "GreenChef" Vanessa Sherwood's recipe for this past Easter weekend. I confess I'm a complete stranger to "raw foodism" but I've been on a bit of a coconut kick lately, thanks to the organic coconuts, coconut milk and oil we have at the co-op right now. So this goodie seems the perfect enticement to check out raw "cooking". ("Raw" as in a consciously-chosen diet consisting mostly or entirely of food that has not been cooked in any way; not, "Oops, I forgot to put this in the oven; oh well, they'll all eat it anyway." Could it be possible that a random kitchen goof was what originally inspired the raw food movement?)
Corinne's version is very similar to Vanessa's except for a few adjustments in the amount of several ingredients; Corinne used 2 cups of macadamia nuts instead of 1/2 for the crust, for instance. "The pie was so yummy," she confessed, "that I had it for breakfast [the next day]!" Breakfast of champions, indeed. Crust: 2 cups macadamia nuts 1/4 of the meat from a small mature coconut pinch of salt 2 Tblsp coconut oil 4 Tblsp agave syrup First layer of filling: 2 cups young coconut meat (approx 2 thai coconuts) 3/4 of the meat from the mature coconut mentioned above 1/2 cup coconut oil 6 Tblsp. agave syrup 2 Tblsp fresh lime jiuce 1/4 - 1/2 cup coconut water (as needed) 1/2 tsp salt 1 tsp vanilla extract 1-2 bananas, sliced Second layer of filling: the meat of 1 small mature coconut 2 bananas 3 Tblsp coconut oil 2 Tblsp agave syrup Line a small springform pan with plastic wrap. For crust: Place all ingredients in food processor and blend to a small crumb. Press into bottom of pan. Place in freezer to set while preparing filling. For filling #1: Place all ingredients, except bananas, into food processor and blend until smooth, carefully adding just enough coconut water to creat a "flowing vortex" (Vanessa Sherwood's term) in the center of the processor. Slice 1or 2 bananas 3/8" inch thick and layer over crust. Spread filling over banana slices. For filling #2: Place all ingredients in processor and blend until smooth. Spread over filling #1. Cover pan with plastic wrap and refrigerate overnight. Serve with chcocolate garnish and non-dairy whipped cream if desired.  For Easter: Jacqueline, the "Dusty Baker" has a recipe for beautiful pastel-dyed tea eggs, achieving beautiful tones with an assortment of teas and herbs such as raspberry earl grey and chamomile. Caveat: this recipe dyes peeled, hardboiled eggs, rather than shells; no doubt the same ingredients could be used for natural dyes, however, just like more traditional sources such as onion peels, beets, etc. If you try it, share your results here with us. (Photograph courtesy of The Dusty Baker.com.) And while we're on the subject of naturally-colored easter eggs, Anne Marie Helmenstine, Ph.D. tells us how to how to do it naturally with this easy recipe. Her handy chart offers several coloring options, most of which are found readily at the co-op or are already in your cupboard. So you're a veganista, or vegan-curious, and looking for some fresh Easter recipes? Take a look at some of these at at VegKitchen. The crustless tofu quiche with mushroom and herbs is hitting my sweet spot; while the spring greens salad with endive and oranges (I would use blood oranges, myself) would be a great way to use the red endive we have at FH right now. I would use blood oranges for this recipe. Because not all of us will be able to sit down to an easter feast (and that's an increasing number of us): Check out the Neighboring Food Co-op Association's (NFCA) "Food Co-ops and Healthy Food Project". The project focuses on ways that co-ops can serve the needs of all community members but especially those at low-income levels, who often have the least access to fresh, healthy food. Our recent member survey tells us that FH customers tend to be more highly-education than the general population as a whole, which may also indicate but does not guarantee higher income levels. The survey also reminds us that we still have a lot of work to do in the community at all income and education levels. How can we best achieve that goal? (Thank you Ellen Anthony for sharing the link): "In the U.S. 23.5 million Americans (including 6.5 million children) live in areas with limited access to affordable and nutritious food, particularly in low-income neighborhoods and communities. The recent recession and its aftermath have had a dramatic impact on communities across our region, affecting people’s ability to provide themselves and their families with healthy food... "Food co-ops would appear to be an effective tool for supporting healthy food access, locally rooted economic infrastructure and ownership opportunities due to the values and principles of the movement...For many food co-ops, there is the central challenge of being affordable to all sectors of the community while also facilitating economic support of food systems that provide high nutrition, protect human and ecological health, and promote fair relationships with producers and farmworkers." 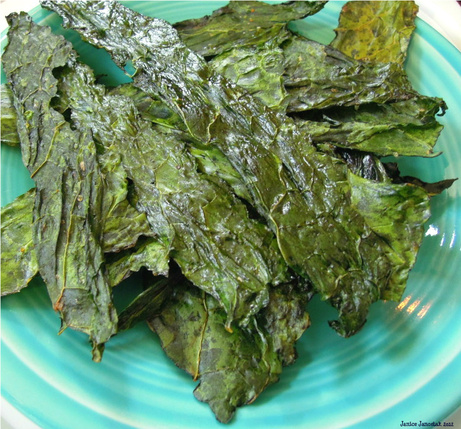 So there I was at the co-op the other day and there they were: two bunches of lacinato kale, a couple of days old, leaves drooping like the willow does; sitting in a dim corner as a divorcee waiting for the final judgement might; ignored as elderly women at the bus stops often are, their wisdom and years of experience sought by no one. Aside from cosmetics, however, there wasn't anything really wrong with them; the stems were firm, the bunches generously sized, and there was no mush or rot whatsoever. The fact remained however that they were no longer as young and attractive as the new batch that was being put out, and therefore no longer desirable. I actually felt sorry for them, if it's possible to feel sorry for kale, of all things, and took them home with me; it didn't seem right for them not to fulfill their intended purpose. The philosophical question, "If the kale had a choice in it's own fate, would it rather have been composted and returned to the earth whence it came, than ending up in my hungry maw?" is one I'll leave for another time. Less unselfishly I also wondered, would slightly past-it's-prime kale be just as good as kale chips as a very fresh and sprightly bunch? Happily for me at least, and everyone else who snacked on them, the answer was "yes"; which means from now on I won't be so prone to shove aside yesterday's kale in a mad dash for today's pretty young things. Kale chips have been a party and snack staple in my house since I first saw Cathy Elton's recipe back in September 2010. Now they've gone mainstream (sort of ); you can find them packaged, as you would potato chips, at Fiddleheads and other "health food" grocery stores. I admit I haven't tried the store-bought version and I ought to just for comparison's sake, but I don't feel compelled to do so either because the homemade version is so good. Like potato chips, they are ridiculously addictive; but unlike potato chips, they are easy to make in an "if I can do it, you can too" sort of way. They do however require a little time and attention on your part to keep them from burning, as they crisp within minutes. Most recipes use the oven, as I prefer; but they can be just as easily done on your outdoor grill, (which I claim as my invention until your attorney tells me otherwise); or even in a dehydrator. Of the two varieties of kale that we carry regularly at the co-op, I prefer lacinato to curly kale (red, green or purple); the broad and relatively flat leaves of lacinato are much easier to work with and provide a perfect platform for the seasonings, whereas I find that curly kale tends to fall to pieces at the ruffled edges. Spicy Kale Chips 1 bunch lacinato or russian kale 2-4 T extra-virgin olive oil or good-quality vegetable oil, plus extra to coat baking sheets sea salt, finely ground, and black pepper, to taste 1/8 - 1/4 teaspoon cayenne powder, or a few drops of tabasco sauce/ hot pepper sauce to taste Preheat oven to 325 degree (F); arrange 2 oven racks in the center of the oven, but allow some air space between for proper heat distribution and circulation. Lightly coat 2-3 large baking sheets with oil (omit this step if using nonstick sheets) and set aside. If the kale has been rinsed, shake well and allow to air-dry, until it's at least dry to the touch. (A slight amount of moisture as it adds a bit of chewiness to the finished chips, which I like; but other folks I've spoken with prefer to their kale to be bone-dry at the start.) Tear the leaves in large pieces from the stems, and put in a generously-sized bowl, such as an enlarged "salad" bowl. Coat with the olive oil by turning with a spoon and/or with your hands, "massaging" individual pieces* until all are well coated. It's not necessary to be 100% coated, however; driving yourself crazy is not the goal here. Sprinkle the seasonings over the leaves and give another few turns to distribute evenly. Place the kale pieces on the baking sheets in batches; if necessary, uncurl the pieces so they lay flat on the pan. Load up your trays as long as the leaves don't overlap; place the baking sheets on the racks in the oven, and bake for approximately 7-10 minutes, checking frequently at that point. To determine doneness, push individual pieces of kale across the tray; if a piece slides easily on the tray and is stiff rather than soft or limp, it's done. If the leaves crumble to pieces at the first touch or are mostly brown in color they are overbaked; check a minute or two earlier next time. Remove individual chips from the baking sheet to a plate, bowl or airtight container as they are ready; return the rest to the oven as necessary. Continue as above with the rest of the kale in batches. You can pile the just-baked chips as high as you like; they cool so quickly that new layers don't cause the earlier ones to loose their crispness (as happens when you layer your waffles just off the iron.) Serve immediately, or store in an airtight container for at least a week - assuming they last that long. They do store successfully and retain their crispness, although when I've made them they are usually gobbled up on the spot. *Some amount of rubbing with your hands is necessary IMO to thoroughly coat the leaves, so obviously this is not the recipe for those of you who don't like to get your hands dirty. If that sort of thing does bother you, however, you might want to consider leaving the kitchen to someone else and pursue less messy hobbies, such as knitting. Or nuclear fusion. Just a thought. 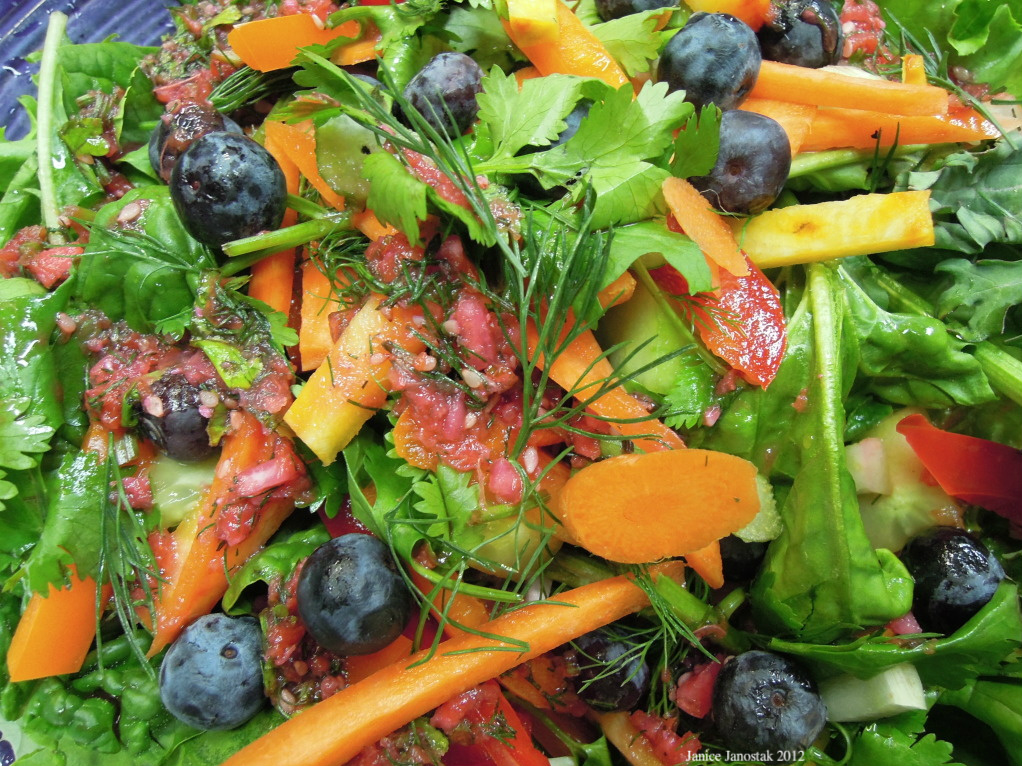
This is the dressing I made for an appearance on “Thinking Green”, the cable access show hosted by Ronna Stuller, earlier this month. The focus of the show was actually a conversation with Rob Schacht from Hunts Brook Farm. He was passionate and knowledgeable and about a variety of issues affecting the business of a small organic farm. (Watch the show on our YouTube channel here.) I meanwhile played "Vanna Organic", and managed to cut open a blood orange for the camera without actually drawing any blood...mine, that is. (Sorry, kids, no squirting arteries for your viewing pleasure; perhaps you'll get lucky next time.) Blood oranges, sesame oil and fennel have been staples in my kitchen lately; the bitterness of the HBF greens provided a perfect foundation for the light and zippy dressing. (Last week Rob and Teresa made their last shipment of bagged mixed greens and spinach to the co-op, which we will dearly miss.) To the salad I also added slices of orange bell pepper, chopped tomatoes, carrots, sliced fennel stalks and more fennel fronds, cilantro leaves and blueberries. This recipe is very flexible and you can alter the herbs and spices to your liking. If you use celery instead of fennel, add a little celery seed; I like to include the chopped leaves in that case. Another evening I mixed the salad dressing with homemade teriyaki sauce (store-bought would work just as well, if you like) in about a 1:1 ratio and used it as a glaze for pork chops; simple directions are below as well. My next adventure will be trying it with a tofu stir-fry; the tofu should absorb the glaze quite well. (If you get there before I do, let me know how it goes for you.) Blood orange, Fennel & Sesame Salad Dressing 3 blood oranges (or other sweet, intense citrus fruit), juiced 1-2 tea. unfiltered apple cider vinegar (I use Bragg’s) toasted sesame oil, in 1 : 1 ratio with the amount of orange juice 3 T fresh fennel or dill fronds, finely chopped; or 1-1/2 T dried fennel or dill 2-3 tea. finely-chopped fennel stem and/or bulb, or same amount celery stalks finely ground sea salt, and black or white pepper to taste 2 tea - 1 T gomasio; or sea salt and sesame seeds, coarsely ground together; plus extra sesame seeds 3-4 cilantro stems and leaves; stems finely chopped and leaves torn 1T honey 1T fresh or frozen blueberries, crushed (optional) Blend all ingredients until thoroughly emulsified; I like to do it by hand with a small whisk, or simply shake vigorously in a jar. Taste after the addition of each ingredient to make sure it suits you, and adjust as necessary. Makes approx 1 cup. Variation - Pork Chop Glaze: Combine equal parts of the dressing (above) with a thick, homemade or store-bought teriyaki sauce. Brown 1-2 pork chops in a lightly-oiled or nonstick pan or skillet on both sides over medium heat; pour sauce over chops and cover, about 1-2 minutes or sauce has thickened on surface of chop, turn and repeat, adjusting heat if needed. If using high-quality pasture-raised pork (with no added preservatives, etc), such as Four Mile River Farm’s, make sure you do not overcook the chops; they should still be slightly pink (not completely grey) and tender inside. 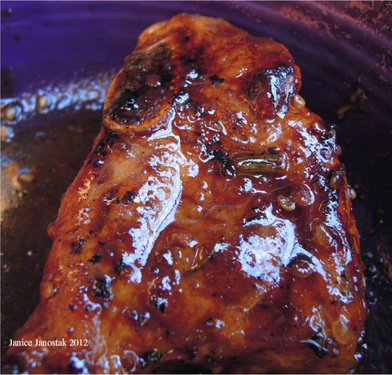
 (Photo and text courtesy of Sue Guida)
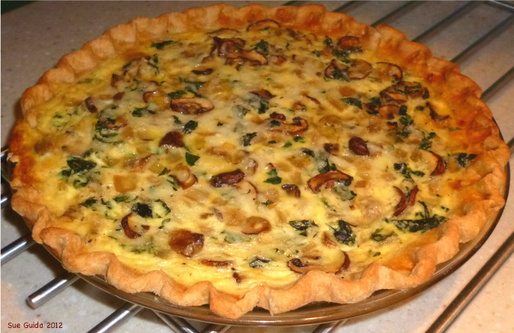
This is a recipe I adapted from a magazine LONG ago, probably Woman’s Day or the like. I generally use a 10-inch pie dish in case I get carried away with the vegetable amounts. This recipe is VERY adaptable; you can use spinach or braising greens instead of the kale; and it's fine with "elderly" kale that's begun to wilt and is just past it's prime. You can also add any fresh or dried herbs you like, other veggies, etc. It really doesn’t matter, IMHO, what kind of cheese you use; I use whatever’s on hand. For this recipe I do prefer the earthy flavor of the crimini to white button mushrooms. -Sue Guida- Sue Guida’s Onion, Crimini & Kale Quiche One baked, 9-inch pie shell with high fluted rim 1/2 bunch kale, stems removed 1 large onion, chopped (1 cup) 1 Tbsp butter or margarine 3 eggs 1 and 1/2 cups milk (I used fat free) 1 Tbsp. flour 1 tsp. salt 1/4 tsp. pepper 1-1/2 cups shredded Swiss cheese Coarsely chop kale leaves and steam until just limp. In a separate skillet saute onions and crimini slices in the butter or margarine till tender; if you wish to add any additional veggies, do so here. Stir in the steamed kale, turn off heat and set pan aside to cool a bit. Beat the eggs, milk flour, salt & pepper till smooth. Stir in cheese and the onion/vegetable mixture. Turn into pre-baked pie shell. Bake in preheated 325F oven 40 min or till knife inserted in center comes out clean – or till nothing jiggles. Cool at least 10 min. Cut and serve 6 Last winter I kept the house stocked on oranges from Fiddleheads, mainly with the intent of staving off colds (the plan worked marvelously, by the way); halfway to pitching some of the rind into the compost bucket one day it occurred to me, "Oh, wait a minute - I can dry this stuff and use in it recipes, can't I?" Why did it take so long for that to occur to me (apart from a distressing lack of mental acuity on my part)? Aside from the classic "We didn't do that when I was growing up" excuse, which comes in amazingly handy on all sorts of occasions (trust me), I think it may well have a lot to do with the fact that I was conditioned by decades of eating non-organic oranges, which we all knew had been sprayed to keep them pretty and long-lasting in storage, but you certainly didn't want to take the risk of drying them and consuming whatever toxins were sprayed on them. (That those toxins might also be inside the rinds, which are porous after all, somehow did not occur to me and, I suspect, to a lot of other people, until much later.) Happily, we have baskets of organic citrus fruit on display and overflowing all season long at the co-op: mandarins (first satsumas, then murcotts); navel, hamlin and red cara cara oranges; blood oranges, tangelos, tangerines, and so on. The rinds can be dried very easily and saved for culinary purposes throughout the year: use them to flavor homebrewed beer or root beer; use them in place of or in addition to freshly grated zest when most citrus is out of season; toss a few handfuls into homemade granola. You can even drop some into an airtight tin of loose dry black or green tea that needs a bit of oomph, along with vanilla bean, anise, cardamon, or any spices of choosing. (The technique would be the same, of course, for any citrus fruit: lemon, lime, grapefruit, etc.) 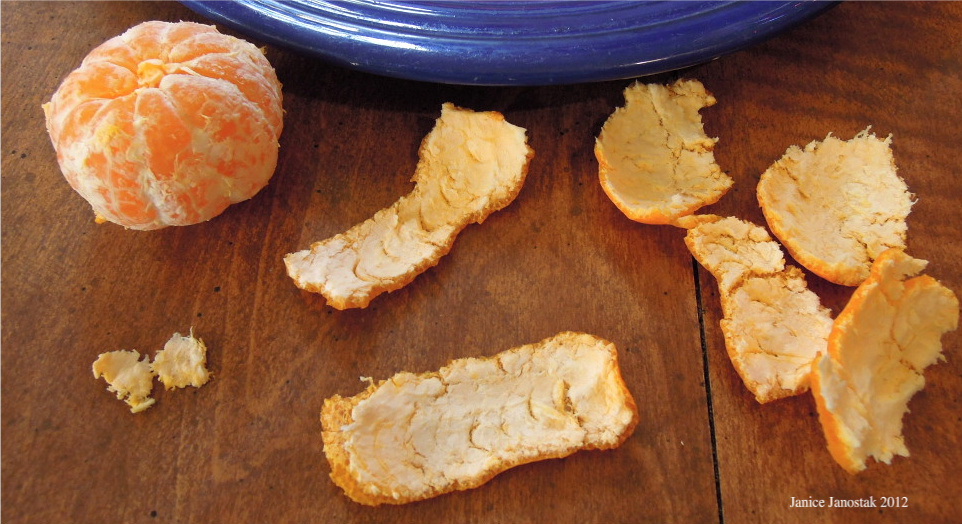 Select the freshest fruit you can find, choosing varieties that have relatively thick rinds, for ease of handling. Tangerines, or other oranges with very thin skins are, ironically, more difficult to work. Also avoid any peel that has begun to dry even slightly sitting on your kitchen table; as the skin shrivels, the pith seems to become attached as tightly as an adult child who cannot bear to move away from Mama. There's just no getting between those two, so best save yourself the heartache. Tear the rind off in chunks or strips, either from stem to navel or around the circumference, and peel off any loose layers of the bitter white pith. I personally find strips easier to work with, probably because the edges provide my hand and eye with a "guide" of sorts. (If you are the person who can write beautifully straight sentences on unlined sheets of paper, that probably won't be a concern for you.) 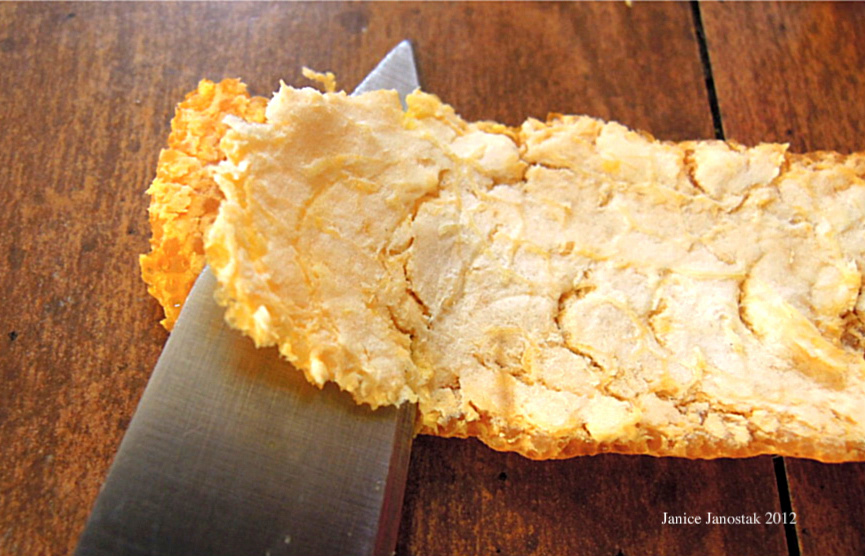 Lay the strips skin-side down on your flat surface and carefully pare or shave as much of the remaining pith as possible from the zest with a small, sharp paring knife with a straight (not serrated edge.) Hold the knife as parallel to the surface of your board/table as possible, and with a slight sawing motion move across the surface. Once you've removed as much of the pith as possible, tear the strips into pieces, lay on a plate or tray and allow to air-dry. (I put mine on a dinner plate and stick them on a slightly-shaded corner of the kitchen table near the wall, where they won't be disturbed.) When the pieces snap and break crisply, rather than bend, they are done. Put them in a good zip bag and gently squeeze out any excess air before zipping shut, or put in an airtight tin or similar container. In either case, it's best to keep out of direct sunlight. 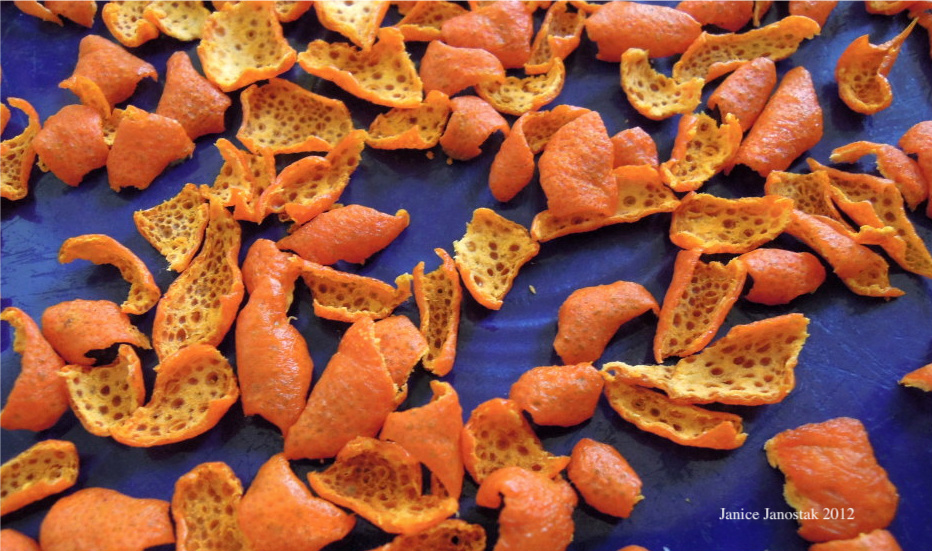 I find 12-48 hours is sufficient time to dry, and sometimes less depending on the heat of the house, the humidity and so on. Very small pieces may be ready overnight. The smaller the pieces the faster they will dry, of course. If stored properly they will last pretty much indefinitely; the bagful I made last winter got me through nearly an entire year. 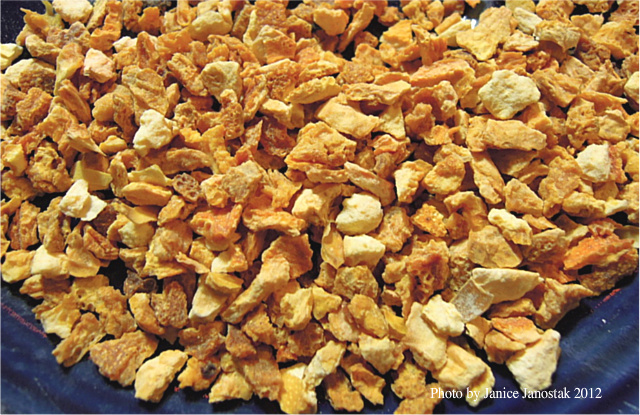 As a comparison, the photograph above is of a sample I bought from one of my favorite organic herb and spice companies; generally I am very happy with their products, but you see how different their dried zest looks to my own. In fact, there's a lot of little chunks of what look to be pieces of pith. It works well enough in a pinch, but hasn't the same intense flavor the homemade does (predictably); and the homemade looks very pretty sprinkled into that aforementioned granola before or after popping the baking tray into the oven. 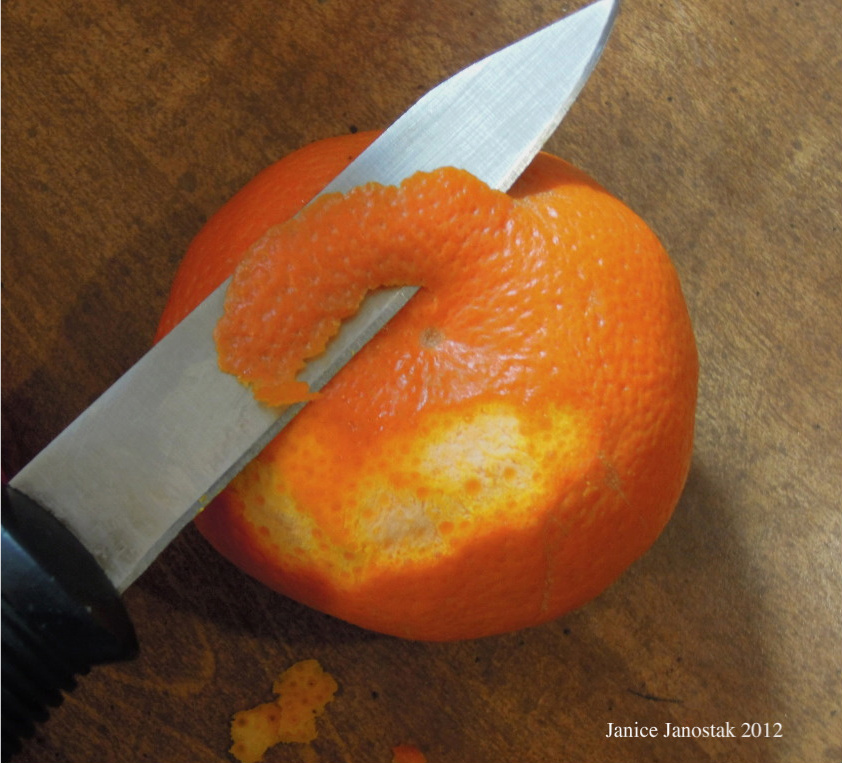 If you eventually get comfortable, or cocksure*, enough with the technique, you can pare the rind from the fruit from the outside, while the skin is still intact, and then pare away any bits of remaining pith on the underside. I have actually done this when I want fresh zest, as none of my erstwhile graters seems to do the job properly on the peel but can shred my fingertips with astonishing precision. I love "blood oranges" but that's taking the idea a bit too literally for my taste.
*No, that's no my favorite word, either, but let's be honest: "ovumsure" just doesn't have quite the same ring, does it?  Portabello Mushroom
Oil on board, 8"x 8" SOLD Co-op member Judy Holder picked up this portabello mushroom from our produce cooler last week and knew immediately she had to bring it home, not to eat it but to paint it! She'd never seen a 'bello from the co-op come with it's own babies, and neither had we. A graduate of Lyme Academy College of Fine Arts whose work is found in international collections, Judy was kind enough to allow me to share her painting here. (The 'shroom came from FH, after all, so it seems only fair.) Visit her blog Always Artful to see this and more of her original paintings, prints and drawings. |
/recipe-archive.htmlPrintable pdf files of the recipes on this blog can be found on our Recipe Archive Page.

Archives
August 2014
Categories
All

Text and photos copyright 2011-2013 Janice Janostak unless otherwise noted. All rights reserved.
|
 RSS Feed
